
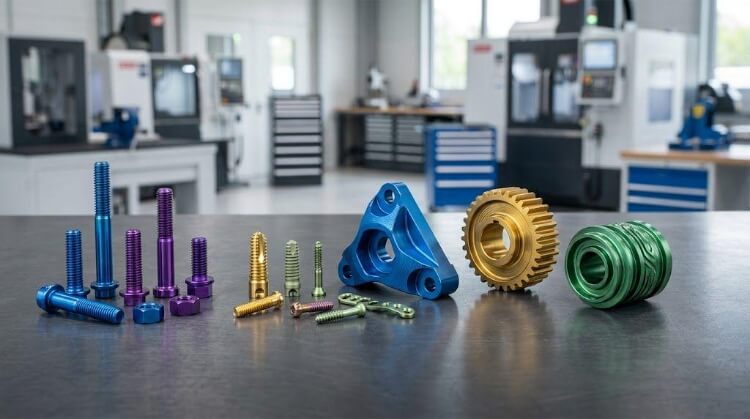
Titanium anodizing is widely known for producing a spectrum of colors, but treating it purely as a cosmetic finish is a costly mistake. In precision manufacturing, this process fundamentally alters the surface condition and drives critical part identification.
Titanium anodizing is an electrochemical process that thickens the natural oxide layer on titanium to create color through light interference, not dyes. It is used to improve surface identification, corrosion resistance, wear behavior, and appearance on medical, aerospace, industrial, and consumer titanium parts.
We will break down why colors shift between production batches and the hidden dangers of reworking high-precision components. You will also learn the design checks required before machining begins, and why treating titanium like aluminum will ruin your project.
What Titanium Anodizing Changes on a Titanium Surface?
Understanding what physically changes on the metal surface is critical for predicting how the part will behave during final assembly and why process limits exist.
Oxide layer growth
Titanium anodizing uses an electrochemical process to accelerate the growth of the metal’s natural oxide layer. It does not add an external coating, paint, or separate material to the surface.
Because this protective barrier is directly derived from the titanium substrate, it does not peel or flake under normal mechanical stress. This integrated structure makes it highly reliable for demanding engineering environments.
Structural color
Dyes or pigments do not produce the colors of titanium anodizing; the color is entirely structural. The transparent oxide layer acts like a prism, or a thin film of oil resting on a puddle of water.
As light passes through the layer and reflects off the base metal beneath it, it creates interference patterns. What your eye perceives as “blue” or “gold” depends entirely on how light interacts with the exact nanometer thickness of that oxide film.
Voltage-color relation
The thickness of the oxide layer—and therefore the resulting color—is directly dictated by the applied electrical voltage. Lower voltages (typically 15-30V) produce thinner layers (around 20-30 nanometers), which appear yellow or bronze.
Higher voltages (up to 100V-110V) create thicker layers (around 150 nanometers) that shift toward green or dark blue. However, there are strict physical boundaries: due to the physics of light interference, it is impossible to achieve a solid, vibrant red through standard titanium anodizing.
Reference Chart: Titanium Anodizing Voltage Spectrum
| Voltage (DC) | Approximate Color | Oxide Thickness | Process Stability |
| 15V – 20V | Light Yellow / Bronze | ~ 20 – 30 nm | Highly stable, very thin layer. |
| 25V – 35V | Dark Blue | ~ 40 – 50 nm | Stable, common for medical coding. |
| 40V – 50V | Light Blue / Ice Blue | ~ 60 – 70 nm | Sensitive to surface prep. |
| 55V – 65V | Gold / Yellow | ~ 80 – 90 nm | Highly stable, widely used. |
| 70V – 85V | Rose / Magenta / Purple | ~ 110 – 120 nm | Requires precise bath control. |
| 95V – 110V | Teal / Green | ~ 140 – 150 nm | Hardest to stabilize; highly sensitive to voltage drops and geometry. |
Note: The exact color output will vary depending on the specific titanium alloy (e.g., Grade 2 vs. Grade 5), surface roughness (Ra), and the electrolyte chemistry used in the bath. This chart serves as a baseline engineering reference.
Corrosion and wear
The thickened oxide layer fundamentally alters the functional properties of the part’s surface. It enhances the metal’s baseline corrosion resistance, particularly in saline environments and under aggressive chemical exposure.
It also changes the surface friction. While it does not harden the bulk material, the anodized layer can improve wear resistance and significantly reduce the likelihood of parts seizing during torque-assisted assembly.
Process limits
Anodizing is not a magic eraser; it will not mask substrate defects. It cannot fill machining marks, scratches, or uneven textures left by previous manufacturing steps.
If a part enters the bath with inconsistent surface roughness (e.g., a mix of Ra 0.8 and Ra 3.2 on the same face), the resulting anodized color will be visibly patchy.
In production, poor mechanical pre-treatment is the leading cause of cosmetic rejection, often resulting in costly batch rework or complete part scrappage. The final anodized result is only as good as the bare-machined surface you start with.
Titanium Anodizing Types and Functions
Different types of titanium anodizing solve different engineering problems. Specifying the correct type depends entirely on your priority: wear resistance, identification, or extreme friction reduction.
Type II wear control
Type II anodizing is driven entirely by function rather than aesthetics, typically resulting in a matte gray finish. It is primarily specified to improve wear resistance and prevent galling.
Galling is a severe issue in which bare titanium surfaces stick, tear, and permanently fuse under load. Preventing this makes Type II the standard choice for aerospace fasteners (often conforming to AMS 2488), sliding assemblies, and orthopedic implants where surface friction must be strictly managed.
Type III color coding
Type III refers to the color anodizing process. While it is popular for consumer goods, its true industrial value lies in rapid visual identification and error-proofing (poka-yoke) on the assembly line or in the field.
In medical device manufacturing, for example, surgical screws are frequently color-coded by size (e.g., gold for 4mm, teal for 6mm). This allows surgeons to instantly identify the correct component, significantly reducing operational errors and handling time in environments where precision is critical.
Type I high-temperature use
Type I is a specialized process usually reserved for high-temperature forming applications and specific thermal environments. It is less common in general CNC component manufacturing compared to Types II and III, but it remains a necessary option when elevated thermal resistance is the primary design requirement.
Type IV self-lubrication
Type IV anodizing builds upon the standard oxide layer by incorporating secondary materials. It typically involves impregnating the porous oxide structure with PTFE (Teflon) to create a surface with permanent self-lubricating, anti-galling properties.
This highly engineered solution is specified for critical friction applications—such as deep-sea housing threads or complex medical assemblies. It is used wherever traditional liquid lubricants are not suitable or would cause unacceptable product contamination.
Process Control in Titanium Anodizing
A common manufacturing misconception is that achieving a target color in titanium is as simple as dialing in a power supply to the correct voltage. In reality, voltage is just one variable in a highly sensitive electrochemical system.
Surface prep
Before a part ever touches the anodizing bath, it must be flawlessly clean. Any residual cutting fluids, stamping oils, or microscopic shop dirt will act as electrical insulators, preventing the oxide layer from forming evenly.
If the pre-treatment protocol (alkaline washing and chemical etching) is inconsistent, the final color will be unstable. A compromised cleaning cycle guarantees a blotchy, rejected batch, wasting both machine time and raw material.
Voltage range
Voltage dictates the final thickness of the oxide layer and sets the baseline color. However, voltage does not operate in a vacuum. The targeted finish results from the combination of voltage, immersion time, bath temperature, and surface condition.
For example, a 65V setting might produce a perfect gold on a freshly prepped part. But if that part is left in the bath just 10 seconds too long, or if the bath temperature fluctuates by a few degrees, that same 65V will yield a completely different hue.
Electrolyte control
The electrolyte bath—commonly a solution such as Trisodium Phosphate (TSP) or a mild acid—facilitates the flow of electrical current. It requires strict chemical management. Variations in chemical concentration or pH levels will directly shift the speed of the oxidation process.
Furthermore, bath contamination is a major commercial risk. A poorly maintained electrolyte tank will cause colors to drift unpredictably halfway through a 5,000-part production shift, resulting in significant inconsistencies.
Fixturing contact
How the part is physically held (racked) during the process is an often-overlooked engineering challenge. The electrical current must flow smoothly from the titanium rack into the part.
If the contact point is loose, it causes localized voltage drops or electrical arcing. This results in burnt marks or distinct color gradients radiating from the fixture point. Racking must guarantee uniform current density across the entire geometry.
Post-treatment
The process does not end when the power is turned off. Freshly anodized titanium has a porous oxide layer that must be thoroughly rinsed and dried to remove lingering electrolyte chemicals.
If parts are poorly rinsed or operators handle them with bare hands immediately after processing, residual chemicals and finger oils can leave permanent water spots or localized discoloration, resulting in immediate QC failure.
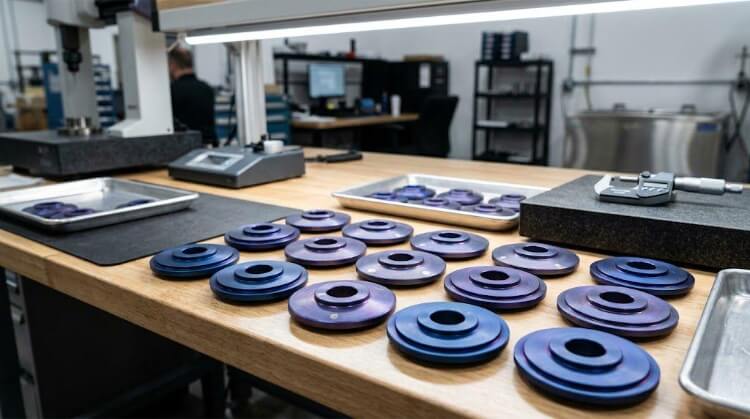
Color Control in Production
It is relatively easy to dial in a perfect color on a single prototype in a controlled lab setting. It is exponentially harder to maintain that same color across mass production.
Alloy variation
Not all titanium reacts the same way. The chemical composition of the substrate heavily influences the anodizing reaction.
For instance, applying 45V to Commercially Pure (CP) Grade 2 titanium will yield a distinctly different shade than applying that same voltage to Grade 5 (Ti-6Al-4V). The aluminum and vanadium alloying elements alter surface conductivity. If your raw material supplier changes, your color output will likely shift as well.
Surface finish
The underlying mechanical surface finish significantly affects the perceived final color. A highly polished surface (Ra 0.2 µm or better) reflects light sharply, resulting in vibrant, saturated colors.
Conversely, a bead-blasted or rough-machined surface (Ra 1.6-3.2 µm) will scatter light. This makes the same anodized thickness appear dull, matte, or pastel. You cannot separate the color specification from the mechanical surface roughness requirement.
Edge and recess effects
Electrical current does not flow perfectly into complex geometries. Deep blind holes, narrow slots, and sharp internal corners suffer from a drop in current density (similar to a Faraday cage effect).
Because the voltage inside a deep bore is naturally lower than on the surface, the inside of a hole will rarely match the exterior color. Engineers must understand that perfect color uniformity across highly complex, recessed features is often physically impossible.
Contact marks
Because the part must be physically clamped to a conductive rack to receive power, there will always be a contact mark where the oxide layer could not form. These marks are an unavoidable reality of the physics involved, not a manufacturing defect.
From a procurement and engineering standpoint, it is critical to define allowable racking locations on your 2D drawings explicitly. This ensures contact marks are hidden on non-cosmetic surfaces or inside functional bores.
Color tolerance
Unlike painting or printing, there is no universal “Pantone” standard for Type III titanium anodizing. Relying on subjective descriptions like “make it ocean blue” is a guaranteed recipe for supplier disputes and rejected shipments.
In mass production, color control requires establishing physical boundary samples. You must define the target color, as well as the acceptable “light limit” and “dark limit.” Color control in titanium is never about hitting a single perfect point; it is entirely about managing the acceptable window of deviation.
💡 Quick Tip: 3 Questions to Ask Your Anodizing Supplier
Before sending out your next batch of tight-tolerance titanium parts, ask your finishing partner:
- Do you use digital or analog power supplies? (You need precision digital control for repeatable Type III colors.
- How do you handle complex geometries? (Ask whether they design custom titanium racks to ensure uniform current distribution.)
- Do you require physical boundary samples? (If they don’t ask for a Light/Dark limit sample before a high-volume run, find a new supplier.
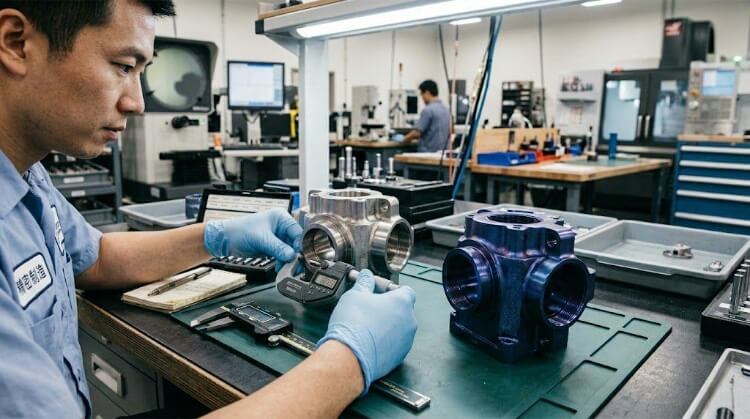
Design and Tolerance Checks
Many anodizing failures do not start in the chemical bath; they start in the CAD file. Identifying cosmetic requirements and geometric risks before machining begins is the only way to prevent costly scrap rates later in production.
Cosmetic surfaces
Not every face of a part requires a perfect, vibrant finish. Engineers must explicitly define the cosmetic requirements on the 2D drawings before requesting a quote.
Clearly mark the primary visual surfaces (A-sides) where color uniformity is critical. Equally important, designate the non-cosmetic areas (B-sides) where allowable contact marks from racking can be hidden. If you demand a flawless finish on 100% of the geometry, you are asking for the impossible and driving up your manufacturing costs.
Surface condition
Many perceived “anodizing defects” are actually machining defects. Because the oxide layer is incredibly thin, it mirrors the exact topography of the base metal.
If a customer demands a perfectly uniform blue finish, the underlying machined surface cannot contain varying tool marks. An area milled to Ra 0.8 µm will look entirely different from a drilled hole left at Ra 3.2 µm, even if both are anodized simultaneously. Uniform color strictly requires uniform mechanical surface preparation.
Geometry sensitivity
Part geometry dictates how electrical current and chemicals flow. Blind holes, sharp internal corners, and extremely thin walls pose major processing risks.
Deep, narrow recesses trap air bubbles or block electrolyte flow, leading to bare spots. They also act as Faraday cages, meaning the voltage naturally drops inside the cavity. Engineers must understand that complex, recessed geometries will almost always show color fading or gradients compared to flat exterior surfaces.
Rework risk
Mistakes happen, but reworking anodized titanium is not as simple as wiping off a layer of paint. If a batch fails QC due to a color mismatch or a surface stain, the only way to fix it is to strip the existing oxide layer and start over chemically.
This requires soaking the precision parts in aggressive chemicals, typically a blend of hydrofluoric and nitric acids. This process is inherently risky and is not viable for every component.
Tolerance loss
The most severe consequence of rework is a loss of dimensional tolerance. When you chemically strip the oxide layer, the acid attacks the base titanium substrate.
A single strip-and-rework cycle can easily remove 0.0002″ to 0.0005″ (5 to 12.7 microns) of material. For parts with tight press-fit bearing bores or precision threads, this microscopic material loss can instantly throw the part out of tolerance, turning an entire batch into expensive scrap.
Titanium vs Aluminum Anodizing
Engineers familiar with standard aluminum anodizing often apply the same assumptions to titanium. This is a critical engineering error. The two processes share a name but operate on completely different chemical and physical principles.
Color mechanism
The way these metals achieve color is fundamentally different. Aluminum anodizing creates a thick, highly porous oxide structure that acts like a microscopic sponge. It must be soaked in organic dyes to absorb color.
Titanium anodizing uses zero dyes. Its color is entirely structural, created by manipulating light interference through a solid, transparent oxide film acting like a prism.
Oxide thickness
The scale of the protective layer is vastly different. A standard Type II aluminum anodized layer is typically 5 to 25 microns thick, while a Hardcoat (Type III) aluminum layer can exceed 50 microns.
In stark contrast, a titanium anodized layer is measured in nanometers. Even the thickest color anodized titanium layer (green) is only about 0.15 microns (150 nanometers) thick.
| Feature | Titanium Anodizing | Aluminum Anodizing (Type II & III) |
| Color Mechanism | Structural Color (Light Interference). Uses zero dyes; the transparent oxide layer acts like a prism to refract light. | Dye Absorption. Creates a thick, porous, sponge-like oxide structure that must be soaked in organic dyes. |
| Oxide Thickness | Nanometers (Extremely Thin). Ranges from 20 nm (yellow) to ~150 nm (green/blue). Equivalent to 0.02 – 0.15 µm. | Microns (Thick). Ranges from 5–25 µm (Type II) to over 50 µm (Type III Hardcoat). |
| Typical Voltage | 15V to 110V DC. Voltage strictly dictates the final oxide thickness and resulting color. | 12V to 24V DC. Process is largely driven by current density, time, and strict bath temperature control. |
| Dimensional Impact | Negligible. Produces zero measurable dimensional change on standard CNC equipment. Machine to final tolerance. | Significant. The thick oxide layer builds outward and inward. Engineers must calculate for dimensional growth prior to machining. |
Dimensional impact
Because aluminum anodizing builds a thick layer (typically penetrating half the substrate and growing half outward), engineers must explicitly account for dimensional growth on their machining drawings.
Titanium anodizing is so thin (under 200 nanometers) that it produces no measurable dimensional change on standard CNC equipment. You machine the titanium to its final finished tolerance before anodizing. Do not apply aluminum growth calculations to titanium parts.
Process conditions
The shop floor conditions for the two metals differ greatly. Aluminum anodizing relies heavily on managing cold-bath temperatures (especially for Hardcoat) and typically operates at 25V or less.
Titanium anodizing is highly dependent on precise voltage control, operating from 15V to 110V and using different electrolyte chemistries. A facility that excels at aluminum anodizing does not automatically have the equipment or expertise to process titanium.
Service environment
The choice between the two materials ultimately comes down to the operating environment. Aluminum is excellent for general lightweight structural applications and heat dissipation.
However, titanium anodizing is specified when failure is not an option in extreme environments. Because the titanium oxide layer is highly biocompatible and virtually immune to saltwater and bodily fluids, it is the undisputed standard for medical implants, aerospace fasteners, and deep-sea components.
Conclusion
Titanium anodizing is a powerful tool for enhancing wear resistance, improving corrosion protection, and enabling rapid visual identification. However, achieving repeatable, high-quality results requires far more than just a power supply. It demands strict control over machining surface finishes, strategic racking placement, and a deep understanding of how geometry affects electrical current.
Ready to manufacture your precision titanium components? With a team of engineers with 10 years of experience in rapid prototyping and mass manufacturing, we help buyers and product teams identify geometric risks before the first chip is cut.
Contact our engineering team today to review your CAD files, discuss your specific finishing requirements, and get a reliable quote for your next titanium project.