The main difference between laser etching and laser engraving is how they alter the material. Laser etching melts the surface to create shallow, high-contrast marks. Laser engraving vaporizes the material to carve deep physical cavities.
In sheet metal fabrication and CNC machining, treating these terms interchangeably is a costly mistake. The right choice goes beyond just mark depth.
Choosing the wrong marking method can lead to unreadable barcodes after powder coating, warped thin-gauge metals, or rejected stainless steel parts due to compromised rust prevention. To specify the right process on your engineering drawings, you must evaluate material type, surface finish, and post-processing requirements.
Quick Answer
Laser etching is usually the standard choice for fast, clean, high-contrast surface marks. It works well for company logos, part numbers, light traceability marks, and indoor sheet metal enclosures.
Laser engraving becomes necessary when the mark needs physical depth to survive. It is the preferred method for heavy-duty parts exposed to mechanical wear, abrasive blasting, outdoor environments, or harsh industrial cleaning.
Laser annealing is a specialized process for stainless steel. It provides a dark, high-contrast mark without removing material, which maintains the metal’s natural corrosion resistance.
Quick Comparison Table
| Factor | Laser Etching | Laser Engraving |
| Surface effect | Surface change (melting/expansion) | Material removal (vaporization) |
| Mark depth | ~0.0001 inches | 0.005 to 0.020+ inches |
| Speed | Seconds per part | Can take minutes per part |
| Cost | Lower (minimal machine time) | Higher (increased machine time) |
| Durability | Good for normal handling | Survives friction and blasting |
| Surface risk | Minimal thermal distortion | High risk of HAZ (Heat Affected Zone) on thin gauges |
| Best use | Logos, part numbers, light traceability | Deep ID, harsh environments, long-term tracking |
| Key concern | Easily erased by sandblasting or thick powder coating | Can trap dirt or affect corrosion behavior if left untreated |
How Each Process Actually Alters the Metal?
To choose the right method, you must understand the physics behind the beam. Each process interacts with metal differently, directly impacting the part’s final integrity.
Laser Etching
During laser etching, the laser beam quickly heats the top layer of the metal. The material absorbs the energy, melting and expanding at a micro-level. This creates a shallow mark, a localized color change, or a slight surface texture.
Because it simply alters the surface rather than cutting into it, the process requires less power and cycle time. However, because the mark is extremely shallow, typical sheet metal finishes like heavy powder coating will completely cover a laser etch. If the part requires coating, the etching usually must be applied afterward.
Laser Engraving
Laser engraving physically removes material from the surface. The high-energy laser pulse vaporizes the metal, acting like a chisel to carve out a recessed cavity. This creates a highly durable mark that survives physical wear and heavy handling.
Removing material creates a permanent micro-cavity, but it introduces manufacturing risks. On thin sheet metal (e.g., under 1.5mm), the intense heat and material removal can cause local warping. Additionally, the carved cavity can trap dirt or corrosive elements if the metal is left untreated.
Laser Annealing
Laser annealing is a specific marking process often used on stainless steel fabrication projects. The laser applies lower heat to induce oxidation beneath the material surface, creating a clean, dark mark.
Unlike engraving, annealing does not remove material or break the passivated layer. This makes it the standard choice for medical devices or food-grade equipment, where breaking the passivation layer leads to immediate QC rejection due to rust risks.
Mark Depth
Mark depth is not a fixed number. It depends heavily on the specific material, laser power, marking speed, number of passes, and the durability requirements of the project.
A standard laser etch may only affect the surface by a fraction of a thousandth of an inch. Deep laser engraving can reach depths of 0.005 to 0.020 inches. Specifying the exact depth on the engineering drawing ensures the mark survives subsequent processes without unnecessarily increasing machine time and cost.
Compare Speed, Cost, and Durability
Production realities force a compromise between cycle times and mark longevity. Evaluating these operational constraints ensures you balance processing costs with long-term performance.
Cycle Time
Because laser etching only melts the surface, it typically takes 1 to 3 seconds per part. Laser engraving must vaporize the metal, requiring slower laser head movement and multiple passes, which can push cycle times to 30 seconds or more. On the shop floor, machine time is money.
Batch Volume
For a 50-piece prototype run, fixture setup and programming drive the cost. However, when scaling to 10,000 units, marking speed dictates the price. Etching becomes highly cost-effective at volume due to its short cycle times, while deep engraving remains a machine-time bottleneck regardless of the batch size.
Wear Resistance
When sheet metal parts face continuous mechanical friction, outdoor exposure, or heavy industrial use, shallow marks will eventually fade. Laser engraving creates a physical cavity that protects the identification code from abrasion, ensuring long-term readability in harsh environments.
Hidden Costs
Specifying a deep engrave adds hidden manufacturing costs. The longer machine time decreases throughput and ties up equipment. Additionally, vaporizing metal generates hazardous fumes, requiring robust extraction systems and adding potential cleaning and inspection steps to remove residual slag from the cavity.
Material Constraints: How Different Metals React
Not all alloys react the same way under a concentrated laser beam. Selecting the correct process prevents structural damage, unexpected oxidation, and ruined optics.
Stainless Steel
Standard etching or engraving breaks the chromium oxide layer on stainless steel, introducing a severe corrosion risk. If the part operates in a corrosive environment, laser annealing is the required method. Annealing darkens the metal beneath the surface without destroying the rust-proof passivation layer.
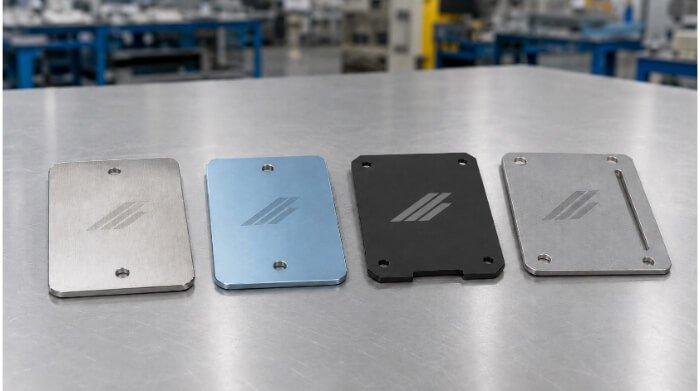
Aluminum
Aluminum reacts differently depending on its finish. Raw and brushed aluminum etch quickly with high contrast. However, marking anodized aluminum removes the protective anodic layer; if you mark after anodizing, the exposed bare aluminum may require a clear coat to prevent oxidation.
Carbon Steel
Carbon steel requires rust protection immediately after fabrication. If you engrave carbon steel before painting or plating, the coating must be thin enough to keep the cavity readable. Etching is usually reserved for parts that will be oiled or receive a clear rust preventative.
Copper and Brass
High-reflective metals like copper and brass absorb standard laser wavelengths poorly. Worse, they can reflect the beam straight back into the optic system, destroying the laser. Marking these materials requires precise focal parameter control and specialized fiber lasers. Do not assign high-reflective parts to a fabrication supplier without proven experience.
Order of Operations: Surviving Coatings and Finishes
The sequence of manufacturing operations can make or break your part traceability. Failing to account for thick coatings or abrasive blasting will completely erase your markings.
Powder Coating
Standard powder coating adds a thick layer—typically 2 to 4 mils—over the sheet metal, which will completely bury a shallow laser etch. If a barcode or part number must remain scannable, the routing must dictate marking after coating, or you must specify a deep engrave before coating.
Anodizing
Laser marking can occur before or after the anodizing bath, and the sequence changes the result. Marking before anodizing seals the metal, but the mark loses contrast and blends into the final color. Marking after anodizing provides stark contrast (usually white on black) but exposes the raw aluminum to the environment.
Blasting
Abrasive finishing like sandblasting or bead blasting will easily erase a standard laser etch. If the manufacturing routing includes blasting to remove weld discoloration or prep the surface for paint, deep laser engraving is required to keep the part number legible.
Passivation
Sequence is critical here. Whenever material is removed from stainless steel through engraving, the exposed metal becomes highly susceptible to rust. These parts must undergo chemical passivation strictly after the marking process to strip free iron from the surface and restore the protective oxide layer.
Cleaning
Industrial degreasing, ultrasonic cleaning, and repeated chemical washdowns can degrade low-contrast marks over time. For parts subjected to intense cleaning cycles, engraving ensures the tracking data and serial numbers remain intact.
Traceability: Ensuring Your Codes Actually Scan
A tracking code is useless if scanners cannot read it on the assembly line. Choosing the right data format guarantees reliable identification throughout the product’s lifespan.
Serial Numbers
Simple alphanumeric serial numbers are the easiest to mark, inspect, and read. They require minimal laser programming and allow human operators on the assembly line or in the field to quickly verify a part without specialized scanning equipment.
Batch Codes
Batch codes tie a specific sheet metal part back to its material heat lot, production date, and manufacturing run. This is essential for ISO-compliant quality control, isolating production defects, and managing after-sales identification.
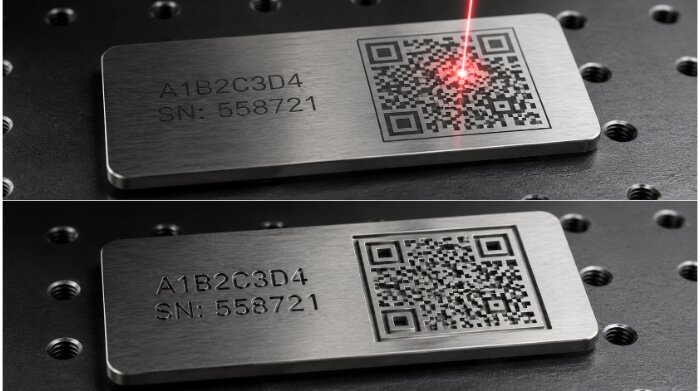
QR Codes
QR codes can store significant data, like links to maintenance manuals, but they require a high-contrast background and a sufficient “quiet zone” (clean, unmarked space) around the edges. They are highly sensitive to surface glare, meaning they can be difficult to scan on raw or polished metal.
Data Matrix Codes
Data Matrix codes are the industrial standard for part tracking. They are much more compact than QR codes and feature built-in error correction, making them readable even if the code is partially damaged. Unlike QR codes, their compact size makes them the only reliable choice for marking curved surfaces like cylinders or machined shafts, where a large code would stretch and lose laser focus at the edges.
Scan Testing
Do not assume a code works just because it looks crisp coming off the laser machine. The code must be tested with a barcode scanner after all subsequent operations—including chemical degreasing, assembly handling, and final packaging. A mark that is readable on raw steel may fail completely after an oil wipe.
How to Call Out Laser Marking on Your Prints?
Vague drawing notes guarantee shop-floor mistakes and costly project rework. Explicitly defining your laser parameters ensures the manufacturer executes your exact traceability requirements.
Marking Content
Do not rely on a generic “Laser Mark Here” note. Explicitly define whether the mark is a company logo, text part number, serial number, or a Data Matrix code. If providing a DXF for specific fonts, ensure all text is exploded into vector lines (converted to curves). Otherwise, the laser software may default to a substitute font and ruin the design.
Marking Location
Show the exact position and orientation of the mark using a bounding box on the CAD file or PDF drawing. Keep marking areas away from sheet metal bend lines, weld seams, or high-wear contact points to prevent structural distortion.
Marking Size
Specify the physical dimensions of the mark. Define the minimum text height for part numbers or the exact square millimeter dimensions for 2D barcodes.
Marking Depth
If the part requires deep engraving to survive abrasive environments, state the required depth tolerance (e.g., 0.005” to 0.010”). This prevents the machine operator from guessing the laser parameters and protects thin-gauge parts from excessive heat.
Process Timing
This is the most frequent cause of shop-floor rework. Explicitly state whether the marking must happen before or after powder coating, anodizing, blasting, passivation, or final assembly.
Inspection Standard
State the acceptance criteria. Define whether the mark only needs to pass a visual check by an operator, or if it must pass automated scan testing to a specific ISO grading standard.
Laser Etching vs Engraving: Making the Final Call for Your Parts
Every manufacturing project demands specific traceability and environmental durability requirements. Use these practical guidelines to specify the exact laser process your sheet metal parts need.
Fast Identification
Use laser etching for clean, high-contrast visual identification. It is the most efficient choice for company logos, alphanumeric part numbers, internal control panels, and parts that operate in controlled, indoor environments.
Deep Permanent ID
Specify laser engraving for heavy-duty components that face continuous mechanical friction, outdoor weathering, abrasive blasting, or a long service life in harsh conditions. The physical cavity ensures the data survives.
Cosmetic Stainless Marks
Rely on laser annealing when processing stainless steel parts for medical, food-grade, or marine applications. Annealing delivers a dark, highly legible mark without breaking the metal’s passivation layer, eliminating the risk of induced rust.
Coated Parts
When dealing with painted, powder-coated, plated, or anodized finishes, always run a sample test first. Finish thickness varies, and what works on one batch of coating might disappear under the next.
Traceability Parts
When a part relies on QR codes, Data Matrix codes, or serialized tracking, implement strict sample approval. Ensure the manufacturer scan-tests the code on the exact material and finish before approving the mass production run.
Conclusion
Laser etching provides fast, clean, high-contrast surface marks and is highly cost-effective for mass production. Laser engraving sacrifices speed to create a deep, physical cavity, ensuring long-term durability in extreme environments.
For stainless steel, coated parts, thin sheet metal parts, and automated traceability codes, the safest engineering choice is to confirm the marking parameters before full production. Testing a physical sample prevents unreadable marks, structural warping, and expensive rework.
If you are developing a new sheet metal fabrication or CNC machining project, the engineering team at TZR can help you determine the exact marking process your parts require. We specialize in rapid prototyping and mass manufacturing, ensuring your products meet strict quality standards from the first cut to the final laser mark. Contact TZR today to discuss your next project.
FAQs
Can a laser etched mark wear off over time?
Yes. Because laser etching only alters the very top surface of the metal (often less than 0.0001 inches), it will wear off if subjected to heavy mechanical friction, sandblasting, or aggressive abrasive cleaning.
Can you laser mark a part before powder coating?
You can, but a standard laser etch will be completely covered by the thickness of the powder coat. If the mark must happen first, you need deep laser engraving. Alternatively, the shop can apply high-temperature Kapton tape to mask the etched area before coating, though this adds manual labor costs. The most reliable method is to laser mark the part after powder coating.
Will laser engraving cause thin sheet metal to warp?
It can. Laser engraving vaporizes metal, which inputs a significant amount of concentrated heat into the part. On thin-gauge sheet metal (typically under 1.5mm), this localized heat zone can cause the material to warp or buckle. Laser etching is a safer alternative for thin materials.
What file formats do manufacturers need for laser marking?
For company logos or specific graphics, provide vector files such as .DXF, .AI, or .SVG. These formats maintain crisp edges at any scale. For text, serial numbers, and barcodes, standard CAD drawing callouts and notes are sufficient for the manufacturer to program the laser.