
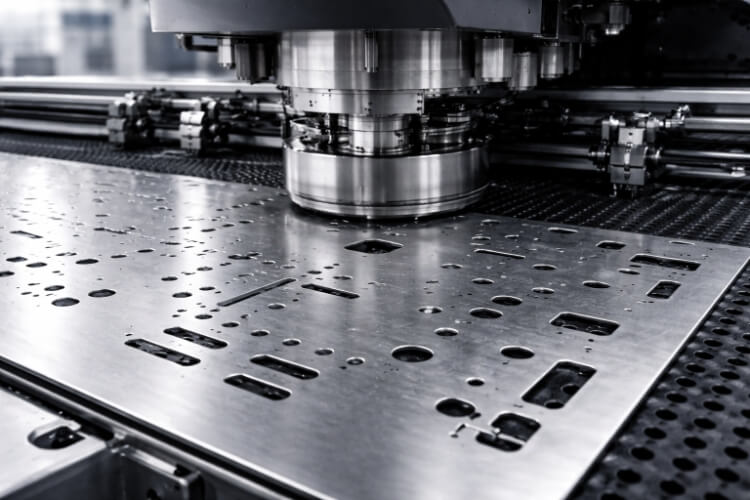
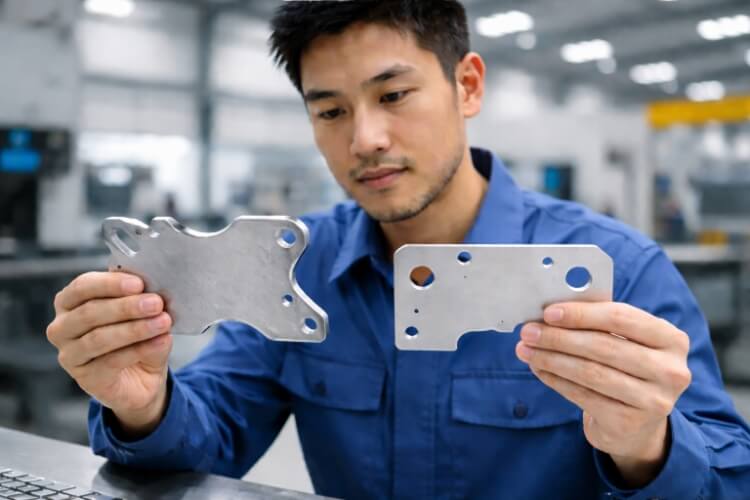
Turret punching is a CNC sheet metal process that uses multiple punch and die tools to create holes, slots, cutouts, and simple formed features in metal sheets. It is best for parts with repeated features, standard shapes, and medium- to high-volume production.
This article looks at turret punching from that practical angle. It explains where the process fits best, what it leaves on the part, which design rules help keep production stable, and what should be checked before manufacturing begins.
Where Turret Punching Fits Best?
Turret punching is not a universal solution for every sheet metal job. It operates on a specific logic: speed through repetition. Here is exactly where the process is most effective and economical.
Part Geometry
Turret presses excel when a design features the same hole or cutout repeated dozens of times, such as perforated grids or ventilation arrays. Because the machine uses a physical die to stamp the entire shape in a single hit, it can operate at speeds exceeding 400 strokes per minute.
This clears out a 50-hole array in seconds. It drastically reduces machine time compared to a laser tracing each individual circle.
Material and Thickness
The process is designed for flat sheet metal, but thickness limits strictly depend on the material’s hardness. Turret punching generally handles aluminum up to 0.250 inches (6.35mm).
However, for stainless steel, most shops cap the thickness at 0.100 to 0.125 inches (2.5mm – 3mm). Pushing past these limits drastically accelerates tool wear and degrades hole quality, which quietly drives up your piece-part cost.
Built-In Forming
Using standard tooling shapes (rounds, squares, obrounds) keeps your custom tooling costs at zero. But the true advantage of a turret press is its ability to manipulate metal in the Z-axis.
By hitting louvers, countersinks, and small embosses in the same machine cycle, you eliminate the need to route the flat pattern to a press brake. Consolidating these features into one setup saves hours of secondary setup time and manual labor.
Medium-Volume Production
Volume dictates the process. If you need 1 to 50 prototypes, laser cutting wins because there is zero setup time. If you need 100,000 units, you need dedicated hard stamping dies.
CNC turret punching owns the middle ground. For batches of 500 to 5,000 parts, the sheer operational speed of the punch press easily absorbs the initial programming and tool-loading setup costs, resulting in a massive drop in the final cost per part.
What the Process Leaves on the Part?
Punching is a violent mechanical process that uses localized tonnage to shear steel. Because of this, hit-based punching leaves distinct physical characteristics on the metal that you must account for in your design and assembly.
Surface Finish
The clamping action of the machine leaves light witness marks around the punched areas. This happens because the stripper pad must clamp down with high pressure to hold the material flat as the punch retracts.
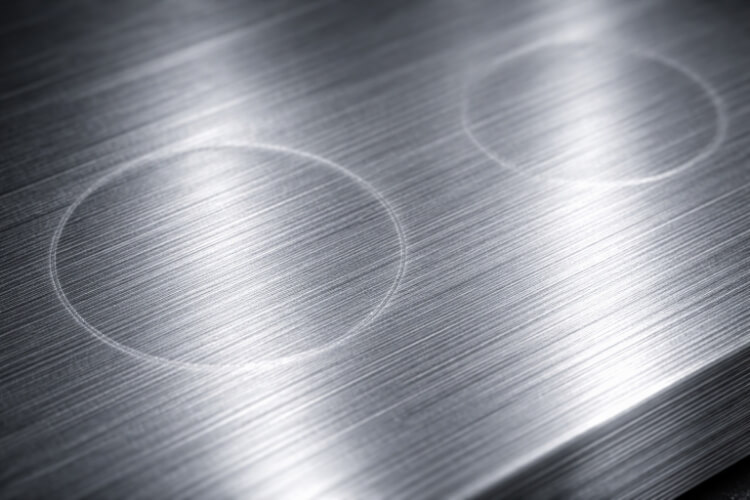
The Fix: If the part has strict cosmetic requirements (like brushed stainless or pre-painted aluminum), call out the “cosmetic face” on your drawing. This alerts the shop to use non-marking brush tables and urethane stripper pads to prevent scratches.
Edge Quality
When a punch overlaps multiple small hits to cut a larger, custom contour, it is called nibbling. This leaves a scalloped, slightly wavy edge rather than the smooth cut produced by a laser.
The Cost Impact: While nibbled edges are perfectly functional for internal chassis brackets, exposed edges usually require manual deburring or grinding to meet safety and visual standards. Designing your cutouts around standard punch sizes instead of large, swept contours eliminates this secondary manual labor, saving both cost and days in lead time.
Edge Profile
Every punched hole has a distinct profile. The top side, where the punch enters, features a smooth “rollover,” while the bottom side features a rougher “fracture zone” and a burr where the metal slug breaks away.
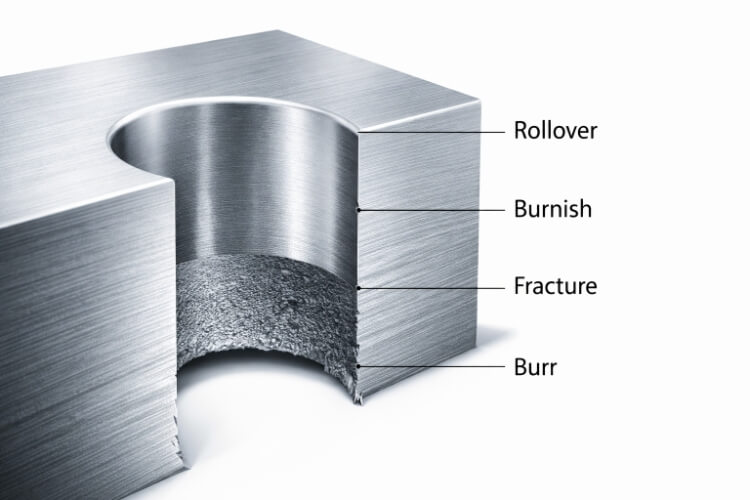
The Fix: As tooling wears down over a production run, this burr becomes more pronounced. Always design with the burr direction in mind. Specify on your drawing which direction the burr should face, or explicitly call out a secondary tumbling/sanding requirement if both sides must be safe to handle.
Design Rules for Punch-Friendly Parts
A successful turret punching job starts in the CAD file. If your design fights the physical limits of the process, you will experience broken tools, warped parts, and inflated quotes. Follow these hard rules to ensure your flat pattern is stable and manufacturable.
Hole Size: The 1-to-1 Thickness Rule
Punching requires extreme force. If the punch is too thin, the resistance of the material will snap the tool.
The absolute minimum hole diameter must be at least equal to the material thickness (a 1:1 ratio). If you are punching 0.060″ (1.5mm) aluminum, your smallest hole should be 0.060″. For harder materials like stainless steel, play it safe and increase that ratio to 1.5x or 2x the material thickness to prevent tooling failures that cause production downtime.
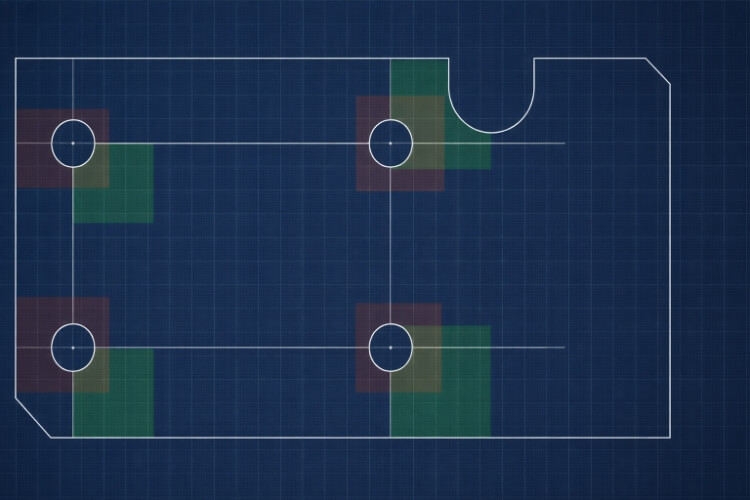
Edge Distance
When a punch penetrates the metal, it displaces material outward. If a hole is too close to the outside edge of the part, the narrow strip of metal (the web) will bulge outward or tear completely.
The Hard Rule: Keep the edge of any punched hole at least 1.5x to 2x the material thickness away from the outer edge of the part. This ensures the perimeter remains straight and dimensionally accurate.
Feature Spacing
Just as holes need distance from the edge, they need distance from each other. If you cluster too many holes too closely together (like in a custom ventilation grid), the remaining webs become too weak to absorb the punching stress.
This causes “oil-canning”—where the sheet metal warps and pops up and down like the bottom of an oil can. Keep the minimum web width between holes at least 1x the material thickness, ideally wider if the hole cluster covers a large surface area.
Form Clearance
The turret press uses metal clamps to grab the sheet and drag it across the table. It also uses a flat stripper pad that presses down around the punch.
If you design a built-in louver or an extruded hole too close to the edge of the sheet, the clamps might crush it. If forms are placed too close to standard holes, the stripper pad will smash the formed feature flat when it comes down to punch the adjacent hole. Keep a generous clearance (at least 1 inch) between forms, flat holes, and the sheet edges.
Production Factors That Control Part Quality
Even with a perfect CAD file, real-world manufacturing introduces variables. Here is what happens on the floor that can degrade your part quality if the shop isn’t controlling the process properly.
Tool Wear
Punches and dies are consumables. As a punch gets dull, it stops shearing the metal cleanly and starts tearing it.
A dull tool increases the size of the bottom burr and can cause “galling”—where microscopic bits of material (especially aluminum) weld themselves to the punch. A quality shop manages this by strictly monitoring hit counts and systematically sharpening their tooling to maintain proper die clearance.
Material Variation
Sheet metal is not perfectly uniform. A sheet of 0.060″ cold-rolled steel might arrive from the mill measuring 0.056″ or 0.064″.
While this 0.004″ variance seems tiny, it directly impacts formed features. If the material is on the thicker side of the mill tolerance, a machine programmed to hit a countersink to a specific depth will suddenly press too deep, ruining the flush fit of your hardware.
Flatness Control
Every single hit introduces localized stress into the sheet. If a part requires 500 holes, that accumulated stress will cause the entire flat pattern to bow or twist.
Experienced programmers mitigate this by using a “staggered” hitting strategy—punching holes randomly across the sheet rather than in a straight line—to evenly distribute the stress. However, for extreme high-density perforations, you must anticipate the need for a secondary roller-leveling operation to flatten the parts back out.
Positional Accuracy
A modern CNC turret press is highly accurate, often holding hole-to-hole tolerances of ±0.005″ (0.127mm).
However, when punching a large, 4-foot panel, the constant punching and dragging can cause the sheet to stretch slightly. A hole punched at the very beginning of the cycle and a hole punched at the very end might drift slightly out of tolerance relative to each other. If you have critical mating points across a massive panel, communicate those datums clearly so the operator can adjust the programming sequence.
What Drives Cost in Turret Punching?
When you receive a quote that seems unusually high, it is rarely a math error. CNC turret punching costs are driven by machine time and manual intervention. Here is exactly what moves the needle on your price.
Hit Count
Turret presses charge by the minute. If your design requires a large, odd-shaped cutout that the shop doesn’t have a specific tool for, they will have to “nibble” it out using 100 overlapping hits with a small round punch.
The Fix: Redesign the cutout to match a standard rectangular or square tool they already own. Dropping the hit count from 100 down to 4 instantly slashes your machine time and lowers the piece-part cost.
Tool Reuse
If you design a standard 0.250″ round hole, the tooling cost is zero. If you design a highly specific “D-sub” connector cutout or a proprietary star shape, the shop has to order custom tooling.
Custom punches cost anywhere from $300 to $1,000+ and add weeks to your lead time. Whenever possible, standardize your internal radii, hole diameters, and slot widths to standard fractional or metric dimensions.
Setup Time
A turret press has a finite number of tool stations (typically 30 to 50).
If your part design includes 15 different hole sizes, the operator must stop the machine, manually remove tools, and load new ones before the job can start. This setup time is billed directly to you. By consolidating your hole sizes—for example, making all mounting holes 0.125″ instead of mixing 0.125″ and 0.150″—you allow the shop to run the job faster and cheaper.
Secondary Operations
The fastest way to ruin the cost-efficiency of turret punching is to require manual labor after the part comes off the machine.
Hand deburring, manual countersinking on a drill press, or tapping threads by hand adds expensive labor minutes to every single part. If your volume is high enough, ask your manufacturing partner if these features can be integrated into the turret program using specialized inline deburring or forming tools.
Turret Punching vs. Laser Cutting
Choosing between a punch press and a fiber laser is rarely a debate about quality; it is a mathematical decision based on geometry and volume. Here is how to judge which process actually fits your part.
Repeated Features: The Speed Advantage
Lasers cut by melting and blowing away metal, tracing the perimeter of every single hole. If a part has 200 quarter-inch holes, the laser must start, pierce, and trace 200 individual circles.
A turret punch stamps the entire quarter-inch hole in a fraction of a second. For high-density perforations, grids, and standard arrays, the punch press is significantly faster and cheaper.
Flexibility Advantage
Lasers do not care about tool shapes. They can cut an intricate, organic curve just as easily as a straight line. If your part features sweeping contours, large irregular cutouts, or sharp internal splines, the laser is the correct choice.
Forcing a turret press to cut a sweeping organic curve requires heavy nibbling, which drives up machine time and ruins the edge quality.
Smooth vs. Sheared
Laser cutting leaves a clean, straight edge with a slight vertical striation. Turret punching leaves a mechanically sheared edge, featuring a smooth rollover on top and a sharp fracture zone on the bottom.
If the part will be exposed to end-users and requires a flawless, burr-free perimeter right off the machine, laser cutting is the safer choice.
Production Purpose
Lasers require zero physical setup—you load the DXF file and press start. This makes them the ultimate tool for rapid prototyping (1 to 50 parts).
Turret presses require an operator to manually load physical punches and dies into the machine’s stations. This setup time makes prototypes expensive. However, once the machine is loaded, the rapid cycle time makes punching the superior choice for medium-to-high volume production runs (500+ parts).
What to Review Before Production Starts?
Before you approve a quote or release a PO, there are specific details that must be locked down. A miscommunication here usually results in rejected parts or unexpected invoice charges.
Stop Over-Tolerancing
If you place a blanket ±0.005″ tolerance block on a 3-foot sheet metal panel, your quote will skyrocket. The shop will have to constantly measure, adjust, and change tooling to hold that number everywhere.
The Fix: Explicitly mark only the critical datums—such as mounting hole centers or press-fit hardware locations—that actually need tight tolerances. Let the non-critical outer dimensions fall into a standard, cheaper ±0.015″ or ±0.020″ range.
Surface Requirements
Do not assume the shop knows the part needs to look pretty.
If you are ordering brushed stainless steel, you must specify the grain direction on your drawing. If the part is an exterior enclosure, add a note stating: “Cosmetic Face: No heavy tooling marks or scratches allowed.” This forces the shop to use protective film, brush tables, and urethane pads during production.
Material Callouts
Specifying “Aluminum” or “Steel” on a drawing is a fast way to get parts that fail in the field. Different alloys behave differently on the punch press.
The Fix: Call out the exact alloy and temper. 5052-H32 aluminum punches cleanly and bends well. 6061-T6 aluminum is much harder; it accelerates tool wear and often cracks if bent. Be explicit about the material grade so the shop calculates the machine tonnage correctly.
Tolerance Priorities
If the machine operator needs to make an adjustment during the run, they need to know what matters most. Does the overall length of the part matter more than the exact distance between two specific mounting holes?
Communicate your design intent clearly. A simple note like “Dimensions between Hole A and Hole B are critical for assembly” saves the shop from guessing.
Conclusion
Turret punching is an incredibly efficient manufacturing process, provided your part geometry respects the physical limits of the machine. It dominates the middle ground of production, offering massive cost savings for parts with repetitive, standard features and built-in forming requirements.
A stable, cost-effective result does not happen by accident. It depends on following hard design rules, understanding how tool wear affects your edges, and having a clear pre-production review with your manufacturing partner.
Ready to optimize your next sheet metal run? If your parts are moving from prototype into production, you need a process that scales. Send us your STEP and DXF files for a comprehensive DFM review. Our engineering team will help you identify unnecessary cost drivers, standardize your hole sizes, and get your parts off the punch press faster.